- Web
- iOS
- Android
- React Native
Install 3DS SDK
There are no additional requirements to enable 3D Secure on Web. You are all set to create a payment with 3D Secure!
Execute 3D Secure
Universal Checkout drop-in and headless automatically renders the 3DS challenge when required by your workflow.Testing 3D Secure
To validate your 3D Secure integration, you can use our dedicated testing guide, which includes sample cards, challenge flows, and different scenarios. For full details, see the 3DS Testing Guide.Install Primer3DS SDK
3D Secure on iOS requires the addition of the
Primer3DS library to your project.With CocoaPods
First, modify yourPodfile like so:source 'https://github.com/CocoaPods/Specs.git'
source 'https://github.com/primer-io/primer-podspecs.git'
use_frameworks!
target 'PrimerSDK_Example' do
pod 'PrimerSDK'
pod 'Primer3DS'
// ...
end
pod install to install Primer3DS on your workspace.In case you encounter an error that the bundle needs signing, add the following post-install script in your podfile.
post_install do |installer|
  installer.pods_project.targets.each do |target|
    if target.respond_to?(:product_type) and target.product_type == "com.apple.product-type.bundle"
      target.build_configurations.each do |config|
          config.build_settings['CODE_SIGNING_ALLOWED'] = 'NO'
      end
    end
  end
end
In case you notice the warning “WARNING! Failed to import Primer3DS” when you initialize the
PrimerSDK, add the following post-install script in the end of your pod file.target 'MyApp' do
pod 'PrimerSDK'
pod 'Primer3DS'
# ...
# This is what needs to be added
post_install do |installer|
installer.pods_project.targets.each do |target|
if target.name == "PrimerSDK"
target.build_configurations.each do |config|
config.build_settings['OTHER_LDFLAGS'] = '$(inherited) -framework "Primer3DS"'
end
end
end
end
end
With Swift Package Manager
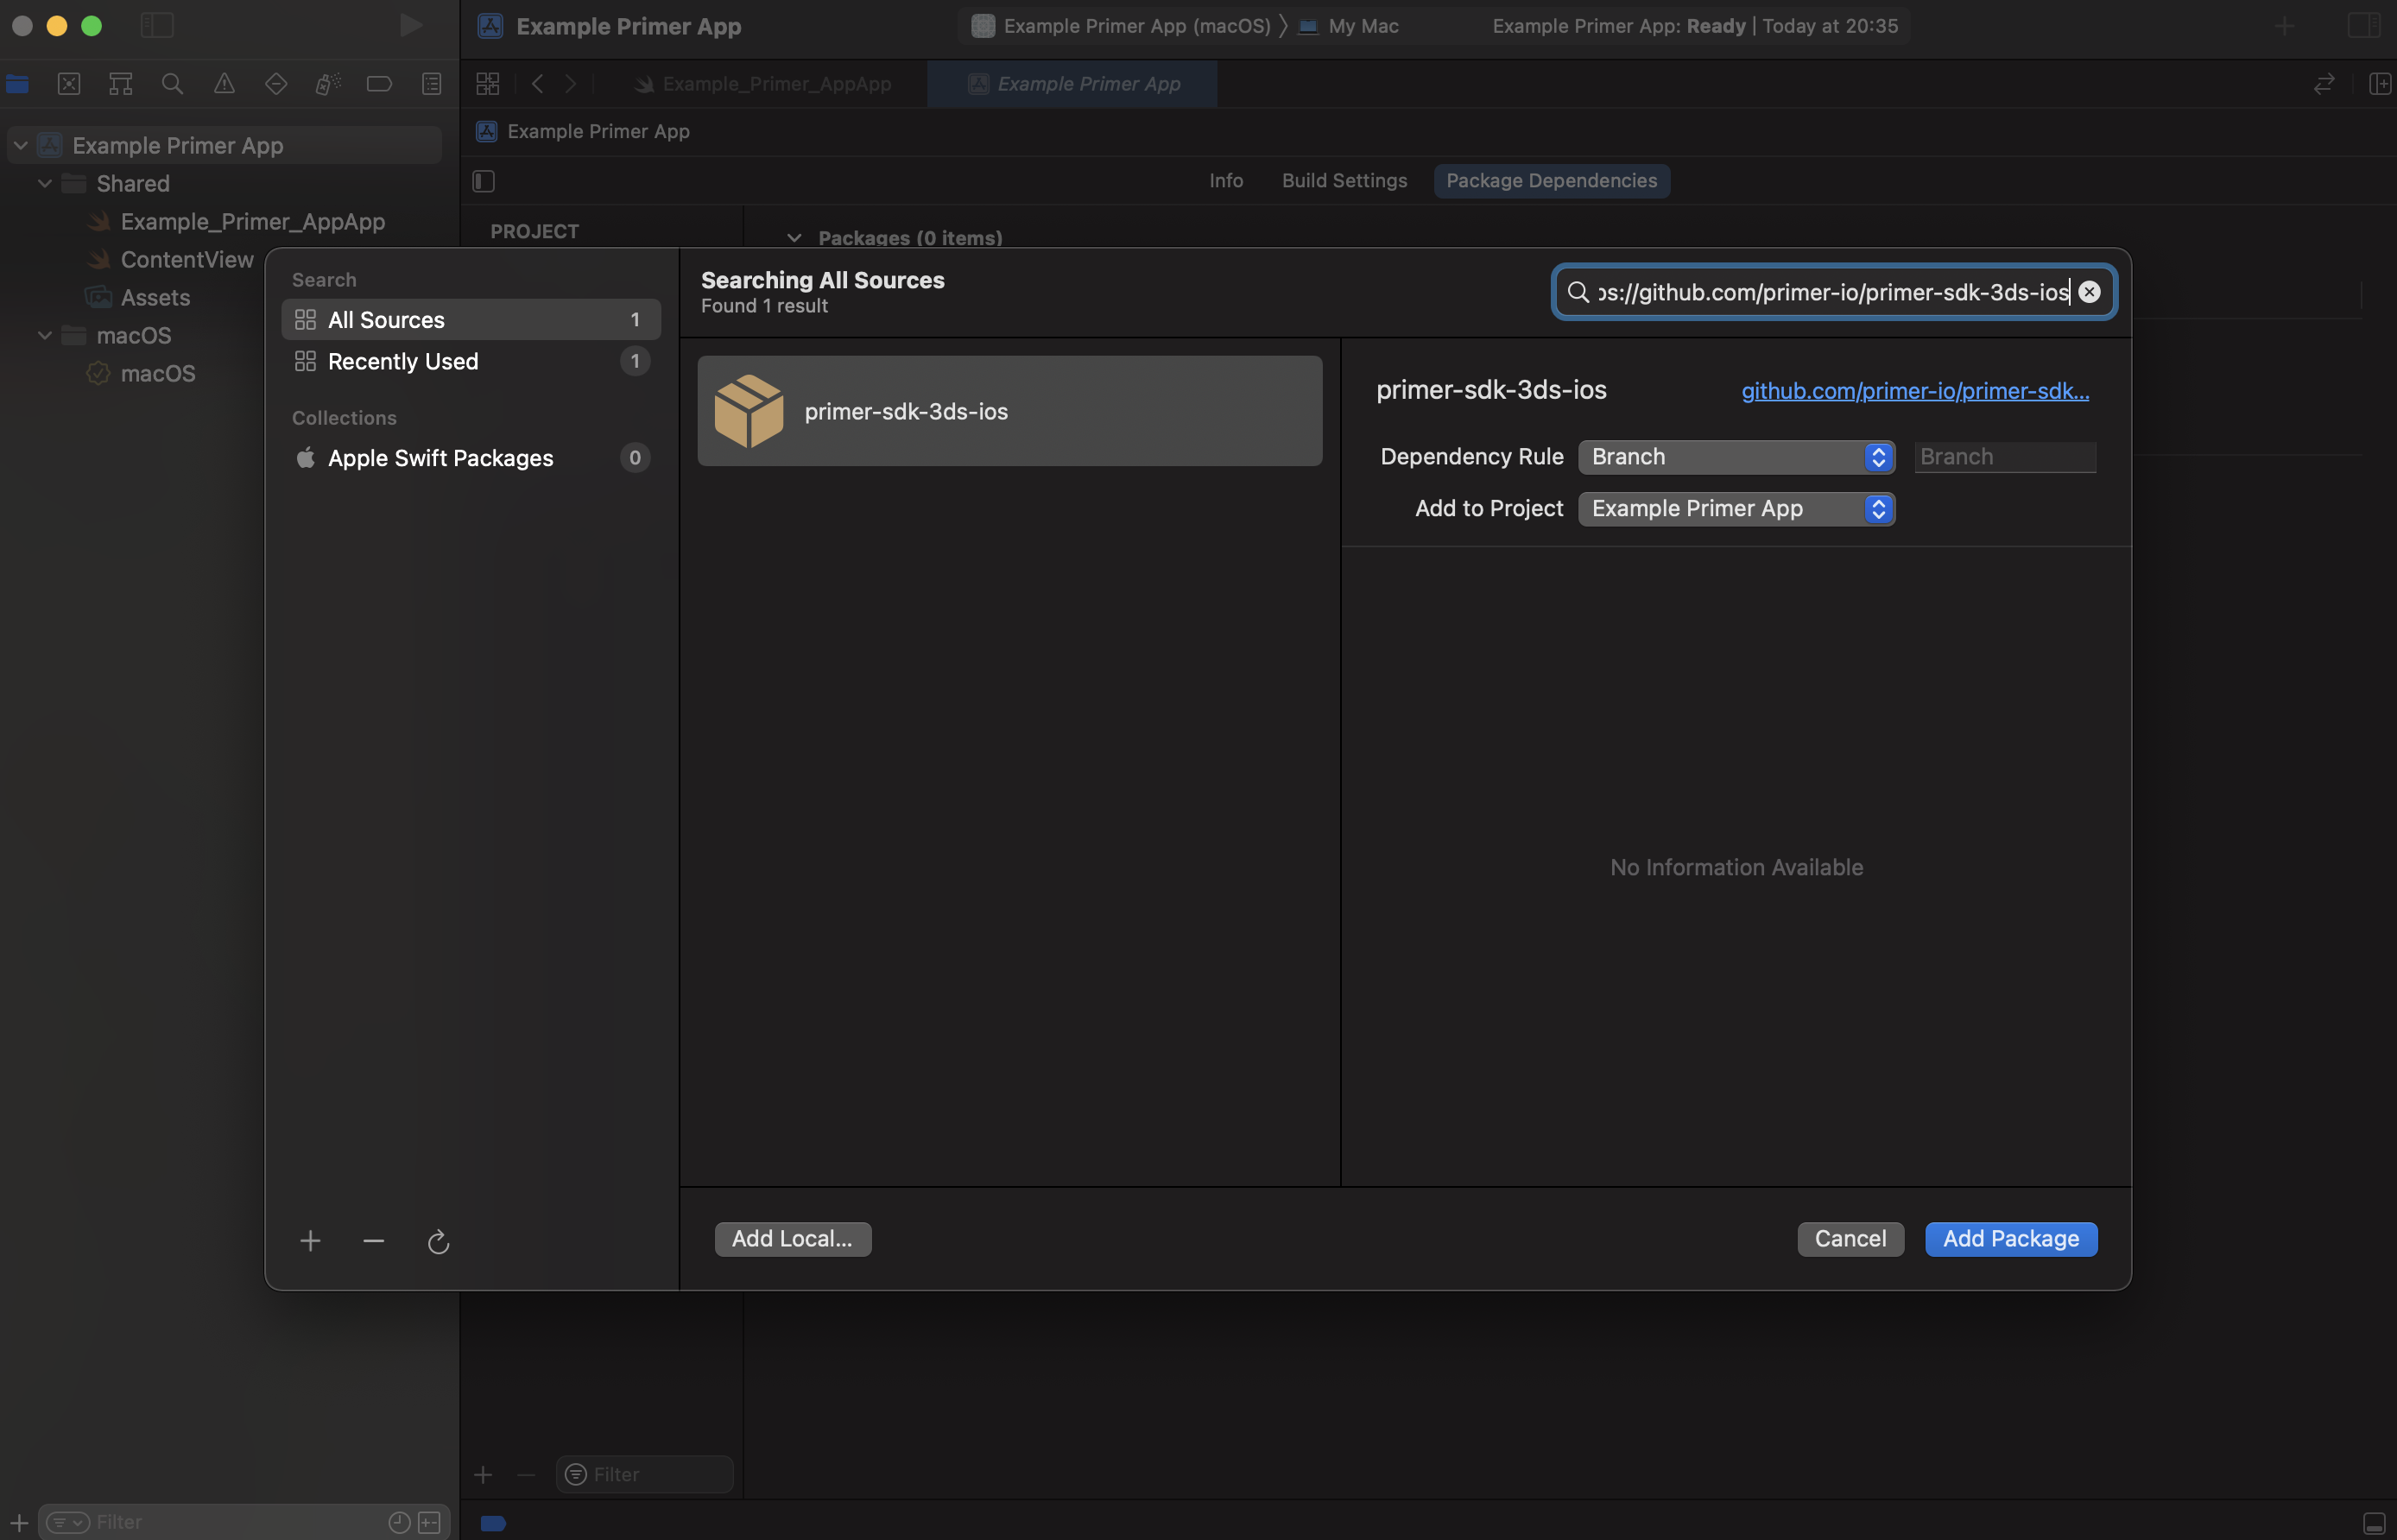
To add PrimerSDK with Swift Package Manager;-
Select your project, and then navigate to
Package Dependencies -
Click on the + button at the bottom-left of the
Packagessection - Paste https://github.com/primer-io/primer-sdk-3ds-ios into the Search Bar
- Press Add Package
-
Let Xcode download the package and set everything up
If
Primer3DS is not installed, 3DS will fail. In the case of a 3DS triggered by the workflow, the primerDidFailWithError functions will be called.Interoperability matrix
To ensure compatibility, please verify a supported Primer 3DS SDK version matches your current Primer SDK Version. Below are the supported interoperable versions:| Primer SDK version | Primer 3DS SDK version |
|---|---|
>= 2.44.0 | >= 2.7.0 |
2.43.0 - 2.44.0 | 2.6.0 |
2.35.0 - 2.43.0 | 2.4.2 - 2.5.x |
2.24.0 - 2.34.0 | 2.3.0 - 2.4.1 |
2.19.0 - 2.23.0 | 2.1.0 - 2.2.1 |
<= 2.18.3 | 2.0.0 - 2.0.2 |
Handle Out-of-Band (OOB) redirects (Optional)
Starting from 3D Secure protocol version 2.2.0, you can enhance the user experience by implementing an automatic redirect from another (authentication) application during an OOB challenge to your application once the challenge is successfully completed. This feature allows for a seamless transition and improved user flow.If this feature is not implemented, the user will have to come back to your application manually to complete their payment, which adds significant friction.
threeDsAppRequestorUrl parameter when configuring the PrimerThreeDsOptions object.Please note that the threeDsAppRequestorUrl value must be an iOS Universal Link.
Additionally, it is essential that your application is configured to handle the Universal Link properly in order to facilitate the redirection.To configure the Universal Link correctly using Universal Checkout, follow these steps:- Pass your Universal Link (e.g.
https://{UNIVERSAL_LINK}) asthreeDsAppRequestorUrlin thePrimerThreeDsOptionsobject of your settings.
let settings = PrimerSettings(
  // ...
  paymentMethodOptions: PrimerPaymentMethodOptions(
    threeDsOptions: PrimerThreeDsOptions(
      threeDsAppRequestorUrl: "https://{UNIVERSAL_LINK}"
    ),
  ),
  // ...
)
- Implement the
application(_:continue:restorationHandler:) -> Boolin yourAppDelegateand callPrimer.shared.application(_:continue:restorationHandler:)function.
import PrimerSDK
import UIKit

@UIApplicationMain
class AppDelegate: UIResponder, UIApplicationDelegate {

  // ...

  func application(_ application: UIApplication, continue userActivity: NSUserActivity, restorationHandler: @escaping ([UIUserActivityRestoring]?) -> Void) -> Bool {
    return Primer.shared.application(application, continue: userActivity, restorationHandler: restorationHandler)
  }
}
- Implement the
application(_:open:options:) -> Boolin yourAppDelegateand callPrimer.shared.application(_:continue:restorationHandler:)function.
import PrimerSDK
import UIKit

@UIApplicationMain
class AppDelegate: UIResponder, UIApplicationDelegate {

  // ...

  func application(_ app: UIApplication, open url: URL, options: [UIApplication.OpenURLOptionsKey : Any] = [:]) -> Bool {
    return Primer.shared.application(app, open: url, options: options)
  }
}
Execute 3D Secure
Universal Checkout drop-in and headless automatically render the 3DS challenge when required by your workflow.Headless Mode UI ConsiderationWhen using Headless Checkout, ensure no custom
UIWindow instances, overlays, or modal presentations are active when 3DS authentication begins. The 3DS processing screen may appear behind your UI if custom window levels are in use.Drop-In Checkout handles this automatically.PrimerDebugOptions.is3DSSanityCheckEnabled to false.
Otherwise 3D Secure library initialization will fail due to security checks being performed.is3DSSanityCheckEnabled flag should only be used in development mode, and not in production release of your app.let settings = PrimerSettings(
// ...
debugOptions: PrimerDebugOptions(
is3DSSanityCheckEnabled: false
)
// ...
)
Troubleshooting
- If you notice a console warning “Failed to import Primer3DS” on the SDK initialization, go to Scheme settings and select
Manual order.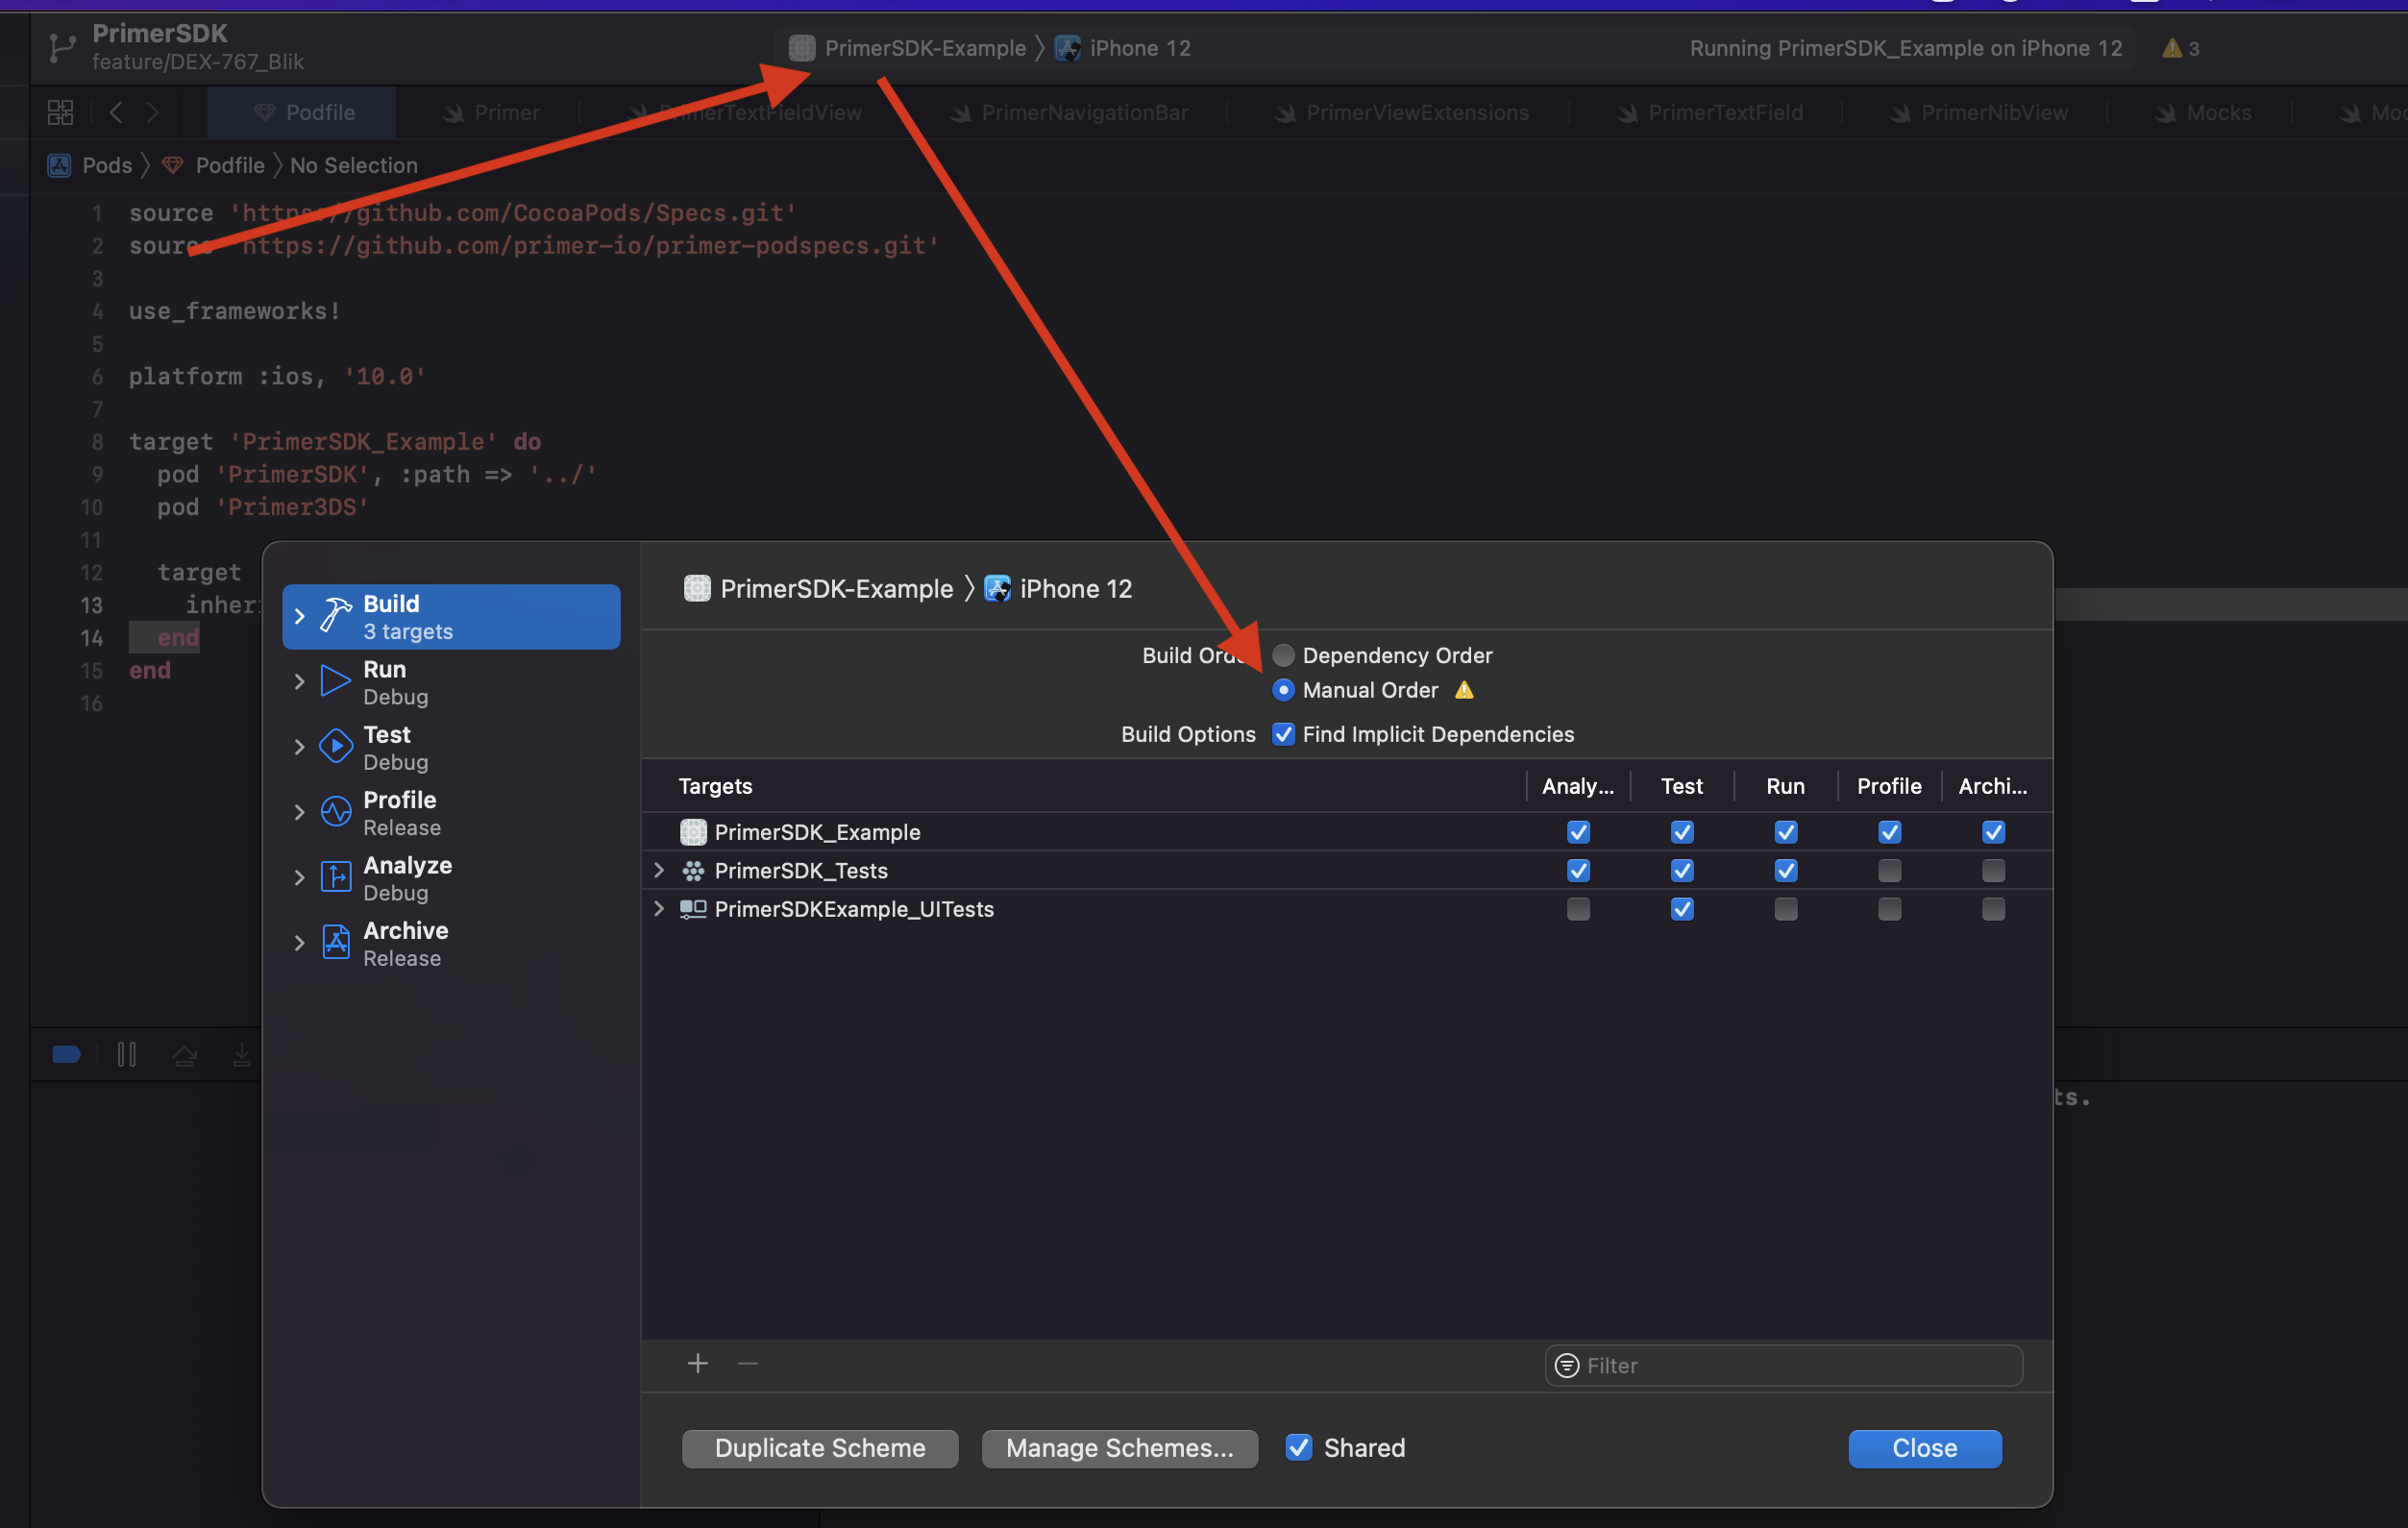
Testing 3D Secure
To validate your 3D Secure integration, you can use our dedicated testing guide, which includes sample cards, challenge flows, and different scenarios. For full details, see the 3DS Testing Guide.Install 3DS SDK
3D Secure on Android requires the addition of the
io.primer:3ds-android library to your project.build.gradle to include the 3ds-android library.
Paste this code, make sure to replace supported-3ds-sdk-version with the right value. See the table below to get the correct one:dependencies {
/* Other dependencies... */
implementation "io.primer:3ds-android:{supported-3ds-sdk-version}"
}
Interoperability matrix
Primer SDK internally uses Primer 3DS SDK as acompile time dependency. In order for the SDKs to work properly,
the versions used internally and the one imported to your code must match.Here is a breakdown of supported interoperable versions:| Primer SDK version | Primer 3DS SDK version |
|---|---|
2.47.0+ | 1.8.0 |
2.46.0 - 2.47.0 | 1.7.0 |
2.41.0 - 2.45.1 | 1.6.2 |
2.32.0 - 2.40.1 | 1.5.0 |
2.27.6 - 2.31.0 | 1.4.3 |
2.27.0 - 2.27.5 | 1.4.2 |
2.25.0 - 2.27.0 | 1.4.1 |
2.24.0 - 2.25.0 | 1.4.0 |
2.21.0 - 2.24.0 | 1.3.0 |
2.17.2 - 2.20.0 | 1.2.0 |
2.16.0 - 2.17.1 | 1.1.2 |
2.15.0 - 2.15.1 | 1.1.1 |
2.0.0 - 2.14.1 | 1.1.0 |
- Clean and sync your project
- Validate that library can be found in
External Librariessection (if you use Android Studio)
Handle Out-of-Band (OOB) redirects (Optional)
Starting from 3D Secure protocol version 2.2.0, you can enhance the user experience by implementing an automatic redirect from another (authentication) application during an OOB challenge to your application once the challenge is successfully completed. This feature allows for a seamless transition and improved user flow.If this feature is not implemented, the user will have to come back to your application manually to complete their payment, which adds significant friction.
threeDsAppRequestorUrl parameter when configuring the PrimerThreeDsOptions object.Please note that the threeDsAppRequestorUrl value must be a Android App Link.
Additionally, it is essential that your application is configured to handle the App Link properly in order to facilitate the redirection.To configure the App Link correctly using Universal Checkout, follow these steps:- Add the following to your
AndroidManifest.xmlfile:
<activity
  android:name="io.primer.android.threeds.ui.ThreeDsActivity"
  android:exported="true"
  tools:node="merge">
  <intent-filter
    android:autoVerify="true"
    tools:targetApi="m">
    <action android:name="android.intent.action.VIEW" />

    <category android:name="android.intent.category.DEFAULT" />
    <category android:name="android.intent.category.BROWSABLE" />

    <data
      android:host="{yourdomain.com}"
      android:pathPrefix="/3ds"
      android:scheme="https" />
  </intent-filter>
</activity>
- Replace the value of
android:hostwith your web domain name, ensuring not to modify any other configuration - Once you’ve made the necessary changes, verify the App Link configuration by following the guidelines provided in the Android documentation.
- Pass your App Link (e.g.
https://{yourdomain.com}/3ds) asthreeDsAppRequestorUrlin thePrimerThreeDsOptionsobject of your settings.
val settings = PrimerSettings(
  // ...
  paymentMethodOptions = PrimerPaymentMethodOptions(
    threeDsOptions = PrimerThreeDsOptions("https://{yourdomain.com}/3ds")
  )
  // ...
)
Execute 3D Secure
Universal Checkout drop-in and headless automatically render the 3DS challenge when required by your workflow.If your application is not installed from a trusted source (e.g. a debug version, not installed from the store, or used on an emulator), try to setPrimerDebugOptions.is3DSSanityCheckEnabled to false.
Otherwise 3D Secure library initialization will fail due to security checks being performed.is3DSSanityCheckEnabled flag should only be used in development mode, and not in production release of your app.Testing 3D Secure
To validate your 3D Secure integration, you can use our dedicated testing guide, which includes sample cards, challenge flows, and different scenarios. For full details, see the 3DS Testing Guide.Install 3DS SDK
3D Secure on React Native requires the addition of the 3DS SDK on iOS and Android.
On iOS
Adding 3D Secure to iOS via React Native requires the addition of thePrimer3DS pod to your Podfile.Depending on how you are using CocoaPods, you may need to add additional configuration to your Podfile. We support three methods for integration: static library, dynamic framework and static framework.You can check which of the three your project is using by running bundle exec pod install in the ios folder of your project and checking the output.e.g.bundle exec pod install
Framework build type is static library
...
Using static libraries
By default, react native apps link pods as static libraries. You can check if your app is using static libraries by runningbundle exec pod install. If it is, you should see the following first line of output:bundle exec pod install
Framework build type is static library
....
Podfile inside the ios directory of your React Native project in a text editor, then add the following:target 'MyApp' do
# ... other CocoaPods config ...
pod 'Primer3DS'
post_install do |installer|
# ... other post_install step config ...
# Add this block, taking care to choose the correct config.build_settings['OTHER_SWIFT_FLAGS'] based on the directive below.
installer.pods_project.targets.each do |target|
if target.name == "primer-io-react-native" || target.name == "PrimerSDK"
target.build_configurations.each do |config|
config.build_settings['FRAMEWORK_SEARCH_PATHS'] = "$(inherited) ${PODS_CONFIGURATION_BUILD_DIR}/Primer3DS"
config.build_settings['LIBRARY_SEARCH_PATHS'] = "$(inherited) ${PODS_CONFIGURATION_BUILD_DIR}/Primer3DS"
config.build_settings['SWIFT_INCLUDE_PATHS'] = "$(inherited) ${PODS_CONFIGURATION_BUILD_DIR}/Primer3DS"
# Note, depending on your integration type, you must choose one of the following settings:
# If you are using frameworks, add the following line
config.build_settings['OTHER_SWIFT_FLAGS'] = '$(inherited) -Xcc -fmodule-map-file="${PODS_CONFIGURATION_BUILD_DIR}/Primer3DS/Primer3DS.modulemap"'
# If you are using static libraries, instead add this line
config.build_settings['OTHER_SWIFT_FLAGS'] = '$(inherited) -Xcc -fmodule-map-file="${PODS_CONFIGURATION_BUILD_DIR}/Primer3DS/Primer3DS.framework/Modules/Primer3DS.modulemap"'
config.build_settings['OTHER_LDFLAGS'] = '$(inherited) -weak_library -l"Primer3DS"'
end
end
end
# ... other post_install step config ...
end
end
bundle exec pod install to finish setting up.Using dynamic frameworks
Although React Native uses static libraries by default, native iOS apps commonly use dynamic frameworks. You can check if your app is using dynamic frameworks by runningbundle exec pod install. If it is, you should see the following first line of output:bundle exec pod install
Configuring Pod with dynamically linked Frameworks
...
Podfile inside the ios directory of your React Native project using a text editor:target 'MyApp' do
# ... other RN iOS config ...
pod 'Primer3DS'
end
bundle exec pod install to finish setting up.As it is dynamically linked, it will automatically be detected by our iOS SDK at runtime, so no additional config is needed.Using static frameworks
Static frameworks are a less common use case, but we are able to support it by configuring your Podfile to allow a mix of statically and dynamically linked frameworks, with the 3DS pod being linked dynamically.You can check if your app is using static frameworks by runningbundle exec pod install. If it is, you should see the following first line of output:bundle exec pod install
Configuring Pod with statically linked Frameworks
...
Note: it might be that your If this is present, then you are using static frameworks by default, even if the shell output for
Podfile is overriding the use_frameworks directive elsewhere, in which case the above shell output may appear incorrect.Check for the following in the app target of your Podfile:use_frameworks! :linkage => :static
bundle exec pod install says differently.Gemfile in the root of your app repo:gem 'cocoapods-pod-linkage'
bundle install in a terminal:bundle install
Fetching gem metadata from https://rubygems.org/.......
Resolving dependencies...
Fetching cocoapods-pod-linkage 0.0.1
Installing cocoapods-pod-linkage 0.0.1
Bundle complete! 3 Gemfile dependencies, 40 gems now installed.
Bundled gems are installed into `./vendor/bundle`
Podfile by including the line:plugin 'cocoapods-pod-linkage'
linkage = ENV['USE_FRAMEWORKS']
if linkage != nil
  Pod::UI.puts "Configuring Pod with #{linkage}ally linked Frameworks".green
  use_frameworks! :linkage => linkage.to_sym
end

# 👇 Add this line here, below the framework linkage check
plugin 'cocoapods-pod-linkage'
Podfile:
# ℹ️ This is already present if you are using static frameworks
# If this is not present then the USE_FRAMEWORKS environmental variable will be set to `static`
use_frameworks! :linkage => :static

target 'MyApp' do

  # ... other CocoaPods config ...

  # 👇 Add these lines to ensure both the SDK pod and 3DS pod are linked dynamically
  pod 'PrimerSDK', :linkage => :dynamic
  pod 'Primer3DS', :linkage => :dynamic

end
post_install block:target 'MyApp' do
# ... other CocoaPods config ...
post_install do |installer|
# ... other post_install step config ...
# Add this entire block
installer.pods_project.targets.each do |target|
if target.name == "primer-io-react-native" || target.name == "PrimerSDK"
target.build_configurations.each do |config|
config.build_settings['FRAMEWORK_SEARCH_PATHS'] = "$(inherited) ${PODS_CONFIGURATION_BUILD_DIR}/Primer3DS"
config.build_settings['LIBRARY_SEARCH_PATHS'] = "$(inherited) ${PODS_CONFIGURATION_BUILD_DIR}/Primer3DS"
config.build_settings['SWIFT_INCLUDE_PATHS'] = "$(inherited) ${PODS_CONFIGURATION_BUILD_DIR}/Primer3DS"
config.build_settings['OTHER_LDFLAGS'] = '$(inherited) -framework Primer3DS'
end
end
end
# ... other post_install step config ...
end
end
react_native_post_install.Finally, run bundle exec pod install to finish setting up.On Android
3D Secure on Android requires the addition of theio.primer:3ds-android library to your project.-
Navigate to the
./androiddirectory in your React Native project. -
Amend the dependencies section of your app’s
build.gradleto include the3ds-androidlibrary. Paste this code, make sure to replacesupported-3ds-sdk-versionwith the right value. See the table below to get the correct one:dependencies { /* Other dependencies... */ implementation "io.primer:3ds-android:{supported-3ds-sdk-version}" }
Interoperability matrix
Primer SDK internally uses Primer 3DS SDK as acompile time dependency. In order for the SDKs to work properly,
the versions used internally and the one imported to your code must match.Here is a breakdown of supported interoperable versions:| Primer React Native SDK version | Primer 3DS Android SDK version | Primer 3DS IOS SDK version |
|---|---|---|
>= 2.42.0 | 1.8.0 | >= 2.7.0 |
2.41.0 - 2.42.0 | 1.7.0 | 2.6.0 - 2.7.0 |
2.35.0 - 2.40.0 | 1.6.2 | 2.4.2 - 2.5.x |
2.34.1 - 2.35.0 | 1.6.2 | 2.3.0 - 2.4.2 |
2.27.2 - 2.34.0 | 1.5.0 | 2.3.0 - 2.4.2 |
2.24.0 - 2.27.1 | 1.4.3 | 2.3.0 - 2.4.2 |
2.21.0 - 2.23.0 | 1.4.2 | 2.3.0 - 2.4.2 |
2.20.0 | 1.4.0 | 2.1.0 - 2.2.1 |
2.19.0 - 2.19.2 | 1.3.0 | 2.1.0 - 2.2.1 |
2.17.2 - 2.18.0 | 1.2.0 | 2.0.0 - 2.0.2 |
2.16.0 - 2.17.1 | 1.1.2 | 2.0.0 - 2.0.2 |
2.15.0 - 2.15.1 | 1.1.1 | 2.0.0 - 2.0.2 |
Handle Out-of-Band (OOB) redirects (Optional)
Starting from 3D Secure protocol version 2.2.0, you can enhance the user experience by implementing an automatic redirect from another (authentication) application during an OOB challenge to your application once the challenge is successfully completed. This feature allows for a seamless transition and improved user flow.If this feature is not implemented, the user will have to come back to your application manually to complete their payment, which adds significant friction.
threeDsAppRequestorUrl parameter when configuring the threeDsOptions
property of your settings for each platform.Please note that the ios.threeDsAppRequestorUrl value must be an iOS Universal Link and the android.threeDsAppRequestorUrl value must be an Android App Link in order to facilitate the redirection.To configure the Universal Link correctly using Universal Checkout, follow these steps:- Pass your iOS Universal Link (e.g.
https://{UNIVERSAL_LINK}) asthreeDsAppRequestorUrl, and your Android App Link (e.g.https://{yourdomain.com}/3ds) in thethreeDsOptionsobject of your settings.
const settings: PrimerSettings = {
  // ...
  paymentMethodOptions: {
    threeDsOptions: {
      iOS?: {
        threeDsAppRequestorUrl?: string;
      }
      android?: {
        threeDsAppRequestorUrl?: string;
      }
    },
    // ...
  }
}
- Follow Step 2 & 3 from the iOS guide.
- Follow Steps 1 to 3 from the Android guide.
Execute 3D Secure
Universal Checkout drop-in and headless automatically render the 3DS challenge when required by your workflow.If this application is not installed from a trusted source (e.g. a debug version, not installed from store, or used on an emulator), try to setPrimerDebugOptions.is3DSSanityCheckEnabled to false.
Otherwise 3D Secure library initialization will fail due to security checks being performed.is3DSSanityCheckEnabled flag should only be used in development mode, and not in production release of your app.const settings: PrimerSettings = {
// ...
debugOptions: {
is3DSSanityCheckEnabled: true,
},
}